I am sure I have mentioned this before, but Halloween makes me all tingly in my special places. Like my spleen. And my inferior vena cava. Probably also my skeleton, which is convenient since I’m going to show you how to make skeleton-covered displays reminscent of the Bone Cathedral in Kutna Hora.
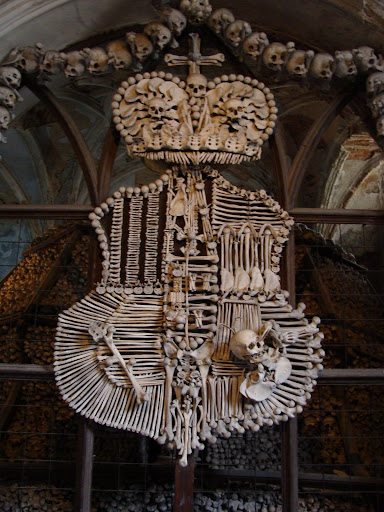
Going to the Sedlec Ossuary in Kutna Hora, Czech Republic is on my “must accomplish before I die a fiery death” list. If you haven’t seen pictures, check the awesome. Google images has a bazillion more, and there are many different “bone churches” throughout the world. Bones became art and decoration when cemeteries were full and needed to be emptied to make room for the newly dead. Morbid. Awesome.
Since I’m mildly (ahem.. cough.. totally.. cough) obsessed with everything skeletal, I figured it was time for a nod to both my favorite holiday and favorite tourist destination with a Sedlec-inspired Halloween chalkboard. Every Friday in the month of October, the other lovely ladies of Wonderstrange will show you a new version of this project. YAY TEAM SKELETON!

A detail shot of the top of my frame. I love how the ribcage/pelvis/vertebrae look almost guitar-like!
 Materials List: (Almost everything used in this project came either from my stash or Dollar General. If you don’t have a Dollar General near you and can’t find skeleton garland, try a Halloween-specific store. Failing that, Ebay is your friend!)
- A cheap thick frame. Mine was 11 x 14.
- Skeleton garland (about 5-6″ tall skeletons hung from twine)
- Strong glue
- Grey Spraypaint (or acrylic)
- Black and white craft acrylics
- Chalkboard paint
- Sandpaper/sanding sponge
First, clean and sand your frame then remove the glass and all the backing bits and set them aside. We’re going to use the glass as the chalkboard, so don’t use it for frustration relief. But seriously, how awesome is the sound of breaking glass when you’re frustrated?! Crazy awesome. Next time you’re ready to climb up the nearest clock tower, go buy some plates from the thrift store, find an abandoned parking lot, and break those suckers. You’ll feel better, I promise. Clean up the bits after you’re done though or skunks will pee on you in your sleep. True story.

The toe bone connected to the foot bone, and the foot bone connected to the ankle bone...
Once you’ve broken some plates and sanded your frame, you can start disassembling your skeletons. I disarticulated four strands of garland, but I probably only used about half of that. Unless you want yours to look EXACTLY like mine, you can totally get away with only a strand or two of the garland. I am greedy, though, and buy every single pack from every single Dollar General in a 30-mile radius from my house. Not that I’m obsessed or anything. Ahem.
At this point you may want to start working on chalkboarding your glass. I used spray paint which worked awesomely and did three coats over two days. You have to let it dry and cure for 24 hours before conditioning it with chalk, so plan ahead! Look at you, all grown up and stuff. So proud. *single tear*
 At this point you can start laying out your design. Symmetry is good! Making those bones look like they want to be Hindu gods is also good! I have ribcages attached to legs, feet used as crowns, heads everywhere. Go nuts, make it cool. I tried several different glues on this and ended up resorting to the old standby, the hot glue gun. I also ended up melting several poor skeletons since they are made out of cheap plastic. Whoops! You can use your favorite sticking stuff to other stuff glue, just make sure it’s a good one!

That bizarre looking thing in the middle is a sidewalk chalk holder. We couldn't find regular chalk at the dollar store. Improvisation!
Once you’ve got all those bits attached, it’s time to paint! I used a cheapo matte grey spray paint from ye olde dollar store for my base coat. It’s pretty much primer grey and reminded me of my first motorcycle, but it was a good base since I wanted my skeletons to look sort of like stone and sort of like old aged dirty bone. I almost left it grey since it looked so weirdly attractive, but I persevered!
As a final step, we’re going to use craft paint to add some depth to the boney bones. If you’ve never done a wash before, it involves using a watered-down acrylic paint, slopping it on and then wiping it off. It’s fun. Really.

The picture to the left is before the wash, the one in the middle is what it looks like right after the paint is slopped on, and the last one is post-wiping!
Once you’ve done that to your whole frame, you should have some awesome shadows. I also used my watered-down black paint to dab sporadically on the bare areas of the frame to give it some texture. Once it’s done, it should look something like this:

With white, we’re going to give a dry brush treatment to pick up highlights. With a dry brush, you dab the brush in the non-watery white paint, paint on scrap paper until the paint is almost gone, and then brush over the top of your skeletons. This will give you some awesome white accents. I also used white in the bare parts of the frame for more texture. I must have invented tire tread in a prior incarnation or something.
 Once you’re done with that, you’re done!! Condition your chalkboard if you need to, reassemble your frame, use your leftover bones to make shrunken head earrings or something, and write yourself a note to get more delicious candy corn. Hang it, admire it, buy a ticket to the Czech Republic (and one for me too, plz), and get down with yo’ bad self!

Can you see the shadowy just-erased "hi mum" message that my kids left? Cute.
xoxo and a finger bone,
Sarah


19 Comments
Russell Black · October 7, 2011 at 9:34 am
Very cool tutorial. Since you don't live close to me I should be able to find some of that skellie garland at my local DG store and I'm going to give this a try.
sarah · October 7, 2011 at 9:46 am
hahahah!!! You are barely far enough away that I haven't cleaned out your store yet. 😉 I'm sure Ms. Ann has extras too, just in case!
Russell Black · October 10, 2011 at 10:43 am
I was beginning to think you HAD cleaned out my local stores. I had to search about six stores before I finally found the skellie garland, but I DID find it and it was 50% off!
sarah · October 10, 2011 at 12:45 pm
Oh no! There must be a skeleton lover running rampant in Indiana! 😉 But woot on the discount!
I can't wait to see what you do with it!
nanner · October 7, 2011 at 12:16 pm
Fantastic! And of course this delicious household boneyard crawled out of your mupptastic mind! Love it!
sarah · October 8, 2011 at 10:25 am
It's all like Thriller up in there. 😉
Jason Pierson D'Angelo · October 8, 2011 at 10:18 am
This is so cool! It looks so incredibly high-end!
sarah · October 8, 2011 at 10:25 am
Why thank you, sir! Not bad for $10 worth of materials and a hot glue gun! 😀
Catherine Drazkowski · October 11, 2011 at 8:41 am
Love this!!
sarah · October 11, 2011 at 6:55 pm
Thank you! 😀
Jensaz · October 11, 2011 at 5:01 pm
totally awesome and mupp-tastic. I may have to try this!
sarah · October 11, 2011 at 6:55 pm
I will be super excited and will have a litter of kittens if you do! A figurative litter. I don't really want kittens.
Aubrey Oddbreed · October 12, 2011 at 7:13 pm
Mupps, you rock…bone diva~im really gonna make something similar! really
sarah · October 12, 2011 at 7:53 pm
hahah bone diva!! Love it!!
You totally should cause there may be a prize in it for you.. just sayin!
TF Balding · October 15, 2011 at 2:18 am
This is too kool, think ima have to give it a try, too. 🙂
sarah · October 19, 2011 at 1:55 pm
I hope you do!! And enter the contest on the forum! 😀
btincup · October 19, 2011 at 1:47 pm
This is really cute and well done. Wish I had some grand kids that might be interested in this!
sarah · October 19, 2011 at 1:54 pm
Thanks! 😀
You should make one for YOU! I made one for me, though my kids think it's theirs. 😉
stoolderomela · November 15, 2011 at 5:29 pm
tacierzynski
zwolnienie lekarskie
praca dla studenta
Comments are closed.